BBQ Chicken Pizza

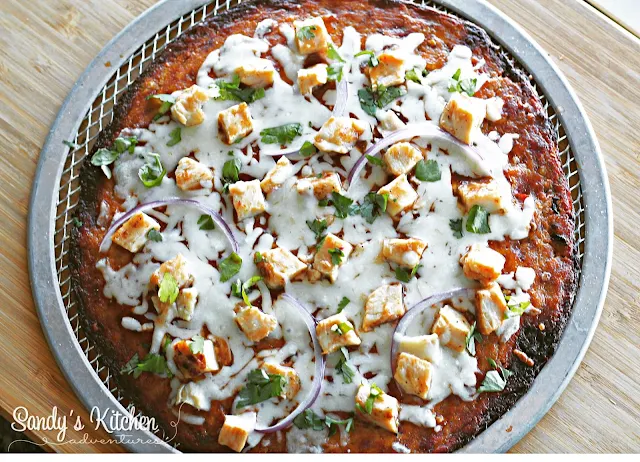
Here is a great recipe for classic bbq chicken pizza using red onions and fresh cilantro. It is a great way to use those yummy Cali'flour pizza crusts you might have on hand!


Or you can make your own cauliflower crusts! Try this homemade recipe!

Favorite Cauliflower Pizza Crust

Keep in mind if you do decide to use the homemade recipe, add 1 more Green to complete your Lean and Green meal! 1/2 cup of assorted sweet bell peppers would be delicious on this bbq chicken pizza!


If you are all about convenience, the lite Cal'flour pizza crusts are amazing and count as 1/2 a Lean and 3 Greens on the 5 and 1 plan! No mess, no stress with making them because the crusts are already made for you! I love the lite crusts rather than the traditional crusts because you can have the entire pizza! Yes!!! If you use the traditional crust, you can only have half the crust, but you can have an additional 1 1/2 Greens. Currently the lite crusts are only available online. Grab them at the link below!


I pre-baked the crust for about 10 min at 400 degrees. Then let the crust cool for 5 to 10 min. Spread 2 tbsp of sugar free bbq sauce on the cooled crust. I used G Hughes Carolina Sweet Heat BBQ sauce I picked up at Walmart. I love this one because it is only 1 g of Carbs for 2 tbsp making it only 1 Condiment for 2 tbsp! Say what?! The other flavors are 2 g of Carbs per 2 tbsp so this flavor is a gem!


Then sprinkle chicken, mozzarella cheese, and red onion on top. To save time, use the breast meat from a rotisserie chicken you find at a grocery store and save the rest of the meat for future meals! Then bake until the cheese melts and garnish with fresh chopped cilantro. 

So yummy! Have a piece! Or eat the entire pizza! It's that delicious!


BBQ Chicken Pizza

Ingredients:
Lite Cali'flour Foods crust * (1/2 Lean, 3 Greens)
1.5 ounces cooked chicken breasts, diced (1/4 Lean)
1/4 cup reduced fat mozzarella cheese (1/4 Lean)
2 tbsp sugar free BBQ sauce (2 Condiments)
1 tbsp red onion, chopped (1 Condiment)
Garnish with 1 tbsp fresh cilantro, chopped 

Directions:
Preheat oven to 400 degrees.
Place crust on a vented pan and bake for about 10 min.
Let cool at least 5 to 10 minutes.
Spread bbq sauce over cooled crust.
Sprinkle chicken and red onion on cooled crust. 
Then add cheese.
Bake for 5 min or until cheese has melted.
Garnish with fresh cilantro.
Let cool for 5 min.

1 Serving with
1 Lean, 3 Greens, and 3 Condiments for the entire pizza

* The recipe calculations are based on the Cali'Lite crusts and not the traditional cauliflower crusts.

Share:

ZUCCHINI PICKLE RELISH


This relish is absolutely delicious and we use it in everything from tuna fish salad, to potato salad, to hot dogs, you name it.........NO ONE has EVER guessed it is made with zucchini, it just tastes like the BEST bread and butter pickle relish you have EVER eaten !!!


12 cups unpeeled zucchini (chopped small)
3 cups sweet onion (chopped small)
1 cup celery (chopped small)
2 large red bell peppers (chopped small)
2 cups peeled carrots (chopped small)
1 cup pickling* salt (see important note)
3 cups white vinegar
3 cups granulated sugar
2 teaspoons turmeric
2 teaspoons DRY mustard powder
1 tablespoon celery seed
1/2 teaspoon black pepper
1 tablespoon corn starch


Wash and dry the vegetables before cutting them (the only one you should peel is the carrot). Coarsley chop the vegetables, then put them in the food processor (2 or 3 cups at a time) and pulse them a few times to get the pieces small enough for a good relish (but not too small). The chop size should look like this:

Measure the vegetables AFTER you chop 
them in the food processor.

Mix the small chopped vegetables and 1 cup of pickling salt. Place this mixture (covered) in fridge overnight (The salt will draw excess moisture out of the veggies).


IMPORTANT NOTE: After the vegetables have chilled overnight, it is VERY IMPORTANT that you rinse the salt off of them. I rinse the chopped veggies THREE TIMES (in small batches).


Whatever method you choose to rinse the salt off, just make sure you rinse, rinse, rinse then squeeze as much water out of the chopped veggies as you can(I use my salad spinner). Set aside.

In a large, non-aluminum, pot, mix the vinegar, sugar, celery seed, spices and corn starch. Bring to a boil (to dissolve the sugar). Add all of the rinsed vegetables to the pot and bring BACK to a boil. Once it is boiling hard, turn heat to medium low and GENTLY boil everything for 20 minutes, stirring every five minutes or so.

While the relish is simmering, sterilize 7 pint jars and 7 (two piece) screw on lids. I do this by putting the JARS through a hot cycle in my dishwasher. Keep the jars in the (unopened) hot dishwasher after the last cycle.


For the LIDS, I just wash them with hot soapy water, rinse them well and then pour boiling water over them in a large saucepan which I keep HOT on a burner.


Also, while the relish is simmering, bring your canning water to a hard boil, here is how:

 Place a rack on the bottom of a large stock pot (or something to keep the jars up off of the bottom of the pan) and fill the pot with water (water should be deep enough to cover the jars by 2". Bring the water to a full boil.

Now that your relish has boiled for 20 minutes, remove it from the heat and place it in the clean hot jars, leaving 1/4" space at the top of the jars (make sure there are no air pockets in the relish). Wipe the rims of the jars with a clean, hot, wet kitchen towel and screw on the two-piece lids fairly tight. Lower the jars into the already boiling water and keep them in there  10 minutes for half pint jars and 15 minutes for pint jars.


Remove from boiling water and let cool to room temperature on your kitchen counter. As they cool on your counter, you will hear the lids "pop" when they make the correct seal.  If they don't "pop", just keep them in the fridge.


NOTE: Do not use regular table salt for this recipe because the anti-caking agents in table salt cause the relish to discolor.  If you don't have pickling salt, the next best thing to use is kosher salt (but I highly recommend pickling salt).


NOTE: The recipe calls for 12 cups of chopped up zucchini. I have found that if I am a cup short of zucchini, I just add an extra cup of chopped carrots. Works well.

NOTE: This recipe makes 7 pints of relish.


ENJOY !!!
Share:

Quick and Easy Egg Salad


Here is a classic egg salad recipe that comes together quick and easy. It uses just a few ingredients proving simple is better.


There are several variations you can make to this egg salad. Try using fresh dill or parsley instead of chives. Or add chopped celery instead of dill pickles for that added crunch you crave in an egg salad. Chopped sweet red pepper or green onions would taste great as well!


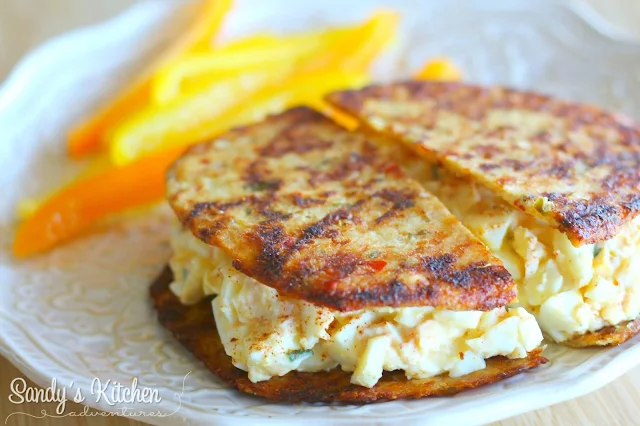
I served this egg salad on two Cali'flour Flatbreads because I was craving a sandwich! They make excellent sandwich slices without all the carbs of traditional bread. Two of these flatbreads count as 1/3 Lean and 2 Greens on the 5 and 1 plan and are made with just cauliflower, egg whites, and mozzarella cheese. That's it!

Head on over HERE to purchase them.

Currently, the flatbreads can only be purchased online.


They also taste delicious wrapped in lettuce. I used iceberg lettuce, but Boston, green leaf, romaine, or butter lettuce are also great choices. Which ever way you decide to eat them, enjoy this simple easy recipe!


Quick and Easy Egg Salad

Ingredients:
6 Hard boiled Eggs (2 Leans)
2 tsp dijon mustard (2 Condiments)
4 tbsp low fat plain Greek yogurt (2 Condiments)
2 tbsp fresh chives, finely chopped (1/2 Condiment)
1/4 tsp salt (1 Condiment)
1/4 tsp paprika (1/2 Condiment)
2 dill pickle spear, finely chopped* (1 Optional Snack)

Directions:
Peel and chop the eggs and put in a medium sized bowl.
Add dijon mustard, Greek yogurt, chives, salt, paprika and pickles. 
Stir gently until combined.
Refrigerate leftovers in an airtight container up to 3 days.

Entire recipe makes 2 Servings
Each serving provides:
1 Lean, 3 Condiments, and 1/2 Optional Snack
(Add 3 Greens to complete your Lean and Green meal)

* If you prefer, you can use 1/2 cup of finely chopped celery , sweet red bell pepper, or green onions (1 Green) instead of dill pickles.

To use this egg salad on Cali'flour Foods flatbreads, divide the  entire recipe into 3 Servings instead of 2 Servings. This would give you 3 Servings with 2/3 Lean, 2 Condiments and 1/3 Optional Snack per Serving. Two flatbreads will make up the other 1/3 Lean and 2 Greens. Add 1 more Green to make a full Lean and Green meal.


Share:

Pumpkin Waffles


 Pumpkin Waffles


Ingredients:

1 Optavia Chocolate Chip or Golden Pancake (1 Fueling)

1/4 tsp pumpkin pie spice (1/2 Condiment)

1 tbsp 100% canned pumpkin (1 Condiment)

1/4 cup water

2 tbsp Walden Farms pancake syrup (1/2 Condiment)


Directions:

Spray mini dash waffle maker with cooking spray and preheat.

Combine all ingredients in a small bowl, except pancake syrup. 

Add half of the batter to waffle maker.

Cook until the indicator light turns off or until done.

Then cook the rest of the batter.

Top with 2 tbsp of Walden Farms pancake syrup.


Makes 1 Serving

Each serving provides:

1 Fueling and 2 Condiments


Click Here to Print


Share:

EASY ITALIAN SAUSAGE

This Italian sausage is delicious and goes together quick and easy.  It calls for ground pork, so I just grind a couple of pork steaks, but you can also use unseasoned commercially ground pork.

When I make this, I fry it all up and then freeze it in small packages so it will be instantly ready for pizza, spaghetti sauce, meatballs etc., it’s great for a million things!!


1 pound of ground pork
1/2 teaspoon black pepper
1/2 teaspoon dry parsley
1/2 teaspoon Italian seasoning
1/4 teaspoon garlic powder
1/8 teaspoon red pepper flakes* (see note)
1/2 teaspoon fennel seeds  (don’t leave out)
1/4 teaspoon paprika (smoked paprika is good too)
1/4 teaspoon dry minced onion flakes
3/4 teaspoon salt
1/4 cup cold water

Measure the seasonings and then grind them all together with a mortar and pestle or spice grinder (so they will distribute evenly throughout the sausage. 


Sprinkle the seasonings over the raw ground pork and then add the water. Mix with your (washed) hands and chill (covered) overnight. That's it!! I told you it was easy !!!


After the sausage has “mellowed” in the fridge overnight,  you can use it or freeze it (it freezes well). 


I’ll never buy pre-made Italian sausage again. It is not only delicious, but I like knowing what is in my sausage!!


ENJOY !!! 
*NOTE: My picky picky husband HATES doesn't like spicy, so this amount of red pepper flakes is ok for him. If you like a little more heat, just add more red pepper flakes.
Share:

Popular Recipes

Labels

Blog Archive

Featured Post

Recipes Snow Fungus Soup

Snow Fungus Soup, also known as "Tremella Soup," is a traditional Chinese dessert that is cherished for its health benefits and re...